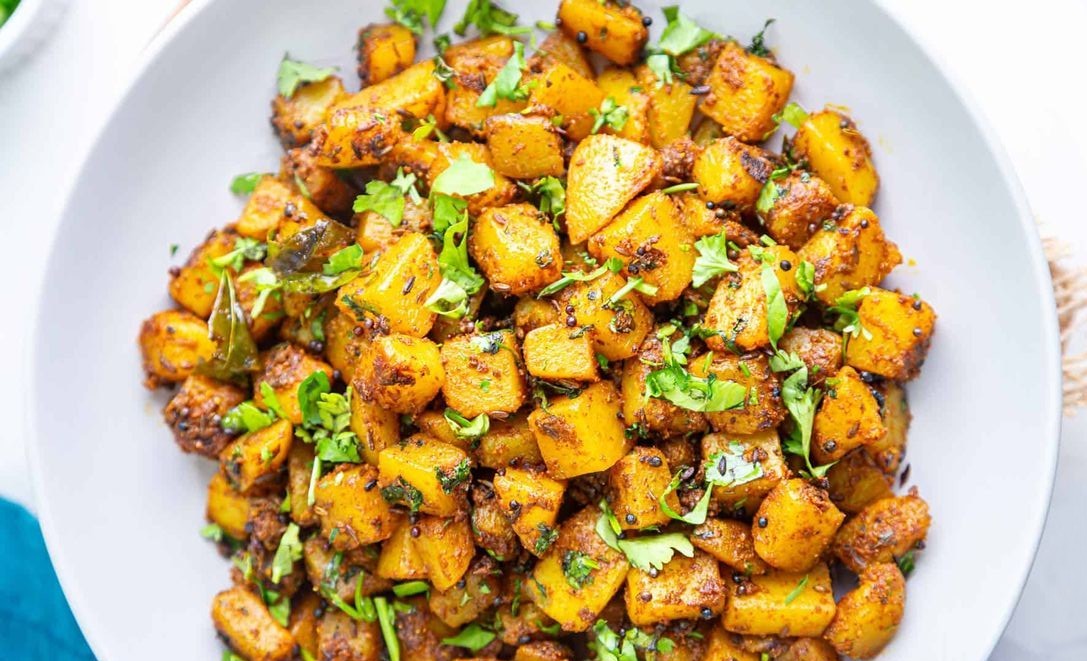
If you’ve ever traveled down the hill terrain of Uttarakhand, you would be aware that the experience is as rare as the place itself. Among all the good experiences, a halt at a roadside tea stall for snacks is one experience that one can in no way live without. One of the food items that I would always patiently wait for at such road journeys was Aloo Ke Gutke — a no-frills yet actually quite decent snack that happened to be an overnight sensation on day one itself. This Kumaoni dish, whose soft, well-spiced potatoes are always flavored like a delicacy, is traditionally served with Pahadi Kheere ka Raita and green chutney. Whether served on a hot cup of tea or as a part of regular meals, Aloo Ke Gutke can become such a dish that it makes someone a hit. And the best part? It is very simple to prepare! About Aloo Ke Gutke The name’s a giveaway — “Aloo” translates to potatoes, and “Gutke” translates to pieces. In Kumaoni, it also refers to “pieces” or “chunks” of potato. This’s a rapid stir-fry by deep-frying boiled potatoes in a cast-iron kadai using run-of-the-mill Indian spices. The result is crispy, golden brown outside and soft, delicious potatoes inside. Aloo Ke Gutke is typically served along with Mandua ki Roti, Dal, and Bhatt Chutney as a side in Kumaon. However, the clincher here is the raita that comes along with it. The pungent potatoes and the refrigerated raita are impossible to substitute anything for! Trip Down Memory Lane I still remember the sheen of tea stalls on road sides where we made a brief halt in between our continuous highway journeys to the plains. There, the roadside vendors used to provide free Aloo Ke Gutke and accompanied by the whitest Pahadi Kheer ka Raita. I would never tire of spicier and sour potato bites with the soothing raita, which is prepared from yogurt. The road trip snack nostalgia lingered with me, and when I started preparing, I was thinking, why not recreate the entire magic right here in my kitchen? With a bit of trial and testing, I was finally able to get the best recipe. And here it is, today, what I wish to introduce you to. It is perfect for an unexpected side dish or snack and delivers a flavor of Kumaon right to your doorstep. The Secret to the Perfection of Aloo Ke Gutke The success of Aloo Ke Gutke is all dependent on good ingredients and cooking. The best way to cook this dish is in a cast-iron pan — it browns the potatoes beautifully and gives them a very powerful smoky flavor, something that is very hard to give using any other pan. And this is how to do it: Ingredients: Potatoes: Try using the Pahadi potatoes if you can. These carry a special sweetness that gives the dish its identity. But use plain potatoes if you cannot lay your hands on these. Baby potatoes are okay too — simply halve them. Spices: You will need turmeric powder, red chili powder, and coriander powder. These are standard Indian spices, and they will work for that hint of spiciness and flavor. Mustard Oil: To get the real taste, mustard oil is your go-to. If not easily available, any cooking oil can be used. Other Ingredients: Brown mustard seeds, cumin seeds, dry red chilies, green chilies, salt, and fresh coriander (cilantro) for garnish. And if you can procure Jambu, a local Kumaoni spice, add half a teaspoon of it. It has a mild onion-chives flavor. Do not worry, however, if you cannot procure it — it is an optional spice. How to Prepare Aloo Ke Gutke Boil the Potatoes: Wash 300g potatoes and add them to a pressure cooker with 2 cups of water. High-flame pressure cook for 2 whistles. Allow pressure to decrease naturally. Once cooled down, remove the potato skin and dice the potatoes small, into ½-inch-sized cubes. Cook Sabji: Heat 2 tsp mustard oil in a karahi made of iron on medium-high heat. Place the ingredients given below into hot oil and stir-fry for about 8-10 seconds: 1 teaspoon brown mustard seeds 1 teaspoon cumin seeds ½ teaspoon jambu (optional) 2 whole dry red chilies 1 teaspoon green chilies (chopped) Add the potatoes, which have been cubed, and toss well to coat with spices and oil. Add the Spice Powders: Stir in 1 teaspoon coriander powder ½ teaspoon turmeric powder ½ teaspoon Kashmiri red chili powder ½ teaspoon salt Mix well and reduce the heat to low. Cover the skillet with a tight-fitting lid. Char and Cook the Potatoes: Boil the potatoes for 12-15 minutes, turning them at equal intervals. The concept here is to cook them in a way that they turn out to be tender, crispy, and golden brown. Sprinkle with salt to taste. Serve with coriander leaves. Tips for a Perfect Dish Mustard Oil: For the actual flavor, never forget mustard oil. Its pungency and rich flavor provide the dish with an added bite. Slow Cooking: Boil the potatoes on low heat after adding spices. This makes the potatoes absorb all the spices and get nicely blackened. Green Chilies: Take the amount of green chilies based on your spice level. I like a little spice, but you can use less if you want it extra spicy. Serving and Enjoying Serve hot Aloo Ke Gutke with green chutney or Pahadi Kheere ka Raita as a side dish. Alternatively, serve with a spicy mandua ki roti and dal as well. Storing Leftovers Don’t fret if you do end up with leftovers! Aloo Ke Gutke will store in a fridge in an airtight container for 3-4 days. Reheat using a pan or microwave and serve. This recipe is so home-like, with visions of home, journey by road, and the simple life in the Kumaon hills. As a side dish or even as a snack, I am sure this recipe is going to provide you
Category: Recipes

Gulgule Recipe | Pua Recipe (Gulgula)
If you’re in the mood for something crunchy, sweet, and hot, Gulgule (or Pua or Pooda, if calling some of North India) is where you’re going. These little doughnut-like snack foods are golden inside and crispy outside. They’re just the perfect accompaniment to steaming hot Chai—just what you’ll be having on lazy rainy days or drizzly afternoons. You can prepare this yummy but not very complicated dessert at home within 25 minutes. Here you can see the gulgule recipe (gulgula). Why Is Gulgule Special So what is their secret to such lightness and sweetness? Mashed bananas are one of the most crucial ingredients in making these gulgule soft and light. They add a light hint of sweetness that is just ideal when balanced by a touch of fennel seeds. Don’t fret if you can’t lay your hands on bananas—this recipe is adaptable enough, and I shall demonstrate how! I learned about making Gulgule from my mother about 8 years ago when we were still living in Delhi. In those days, the family members would get together and enjoy hot, crispy doughnuts on rainy days. The fragrance of the sweet fragrance of rain-filled air that came afterwards always used to be an awesome experience with relatives. Gulgula vs. Malpua: What’s the Difference? Although of the same category, gulgula and malpua are two distinct dishes. This is a very short summary: Gulgula: Frittered or doughnut-like, crispy on the outside and soft on the inside. Slightly sweet because of fennel seeds, but not because of sugar syrup. Malpua: Pancake pan-fried but sugar syrup-dipped, thus a bit sweeter than Gulgule. Both are tasty, with Gulgule being lighter in flavor and texture! Ingredients for the gulgule recipe Preparation of Gulgula is very small, and I am confident you would already have all the ingredients prepared at home. These are the ingredients that you will require: Bananas: They add a good softness to the Gulgule. Bananas are not available, then omit them or increase water and sugar in the batter. Jaggery/Sugar: I have used jaggery for emotional reasons, but you may also use white sugar. Whole Wheat Flour: Nutty flavor, but not if you replace it with the all-purpose flour. Fennel Seeds: That heavenly spice which imparts anise-y sweetness and magic that transforms plain Gulgule into drool-worthiness. Green Cardamom Powder: Floral sweetness. Baking Powder: Lightness! Do not use to make your Gulgule heavy. Use to make your Gulgule light. Water: Use to reach your batter at the right consistency. Oil: For frying. Use a neutral oil like sunflower or avocado. Gulgule (Pua) making Ready to prepare these teeny tasty bites, are you? Just follow how below, step by step. Prepare the Batter 1. Mash the Bananas: Mix ½ cup mashed banana and 6 tbsp sugar (or jaggery) together in a bowl. Beat well with the assistance of a vegetable masher or a fork till the sugar dissolves. 2. Dry ingredient blend: Add the following to the banana blend: 1 cup whole wheat flour 1 teaspoon fennel seeds ¼ teaspoon green cardamom powder (optional) ½ teaspoon baking powder Pinch of salt 3. Batter Mix: Add water gradually, ½ cup at a time, and mix very well. The batter should be thinner than the pakoda batter, but not too thin. Add 8-11 tablespoons of water, depending on the flour. Don’t mix it too much because it becomes thick. Deep-fry the Gulgule Heat the Oil: In a deep pan or kadai, heat enough oil to deep-fry the gulgule. The oil should be hot but not smoking—around 350-375°F (177-190°C). To test if it’s ready, drop a small piece of batter into the oil. If it rises steadily, you’re good to go! Throw Batter: Spoonful by spoonful, spoon batter into hot oil with a spoon. Don’t get the pan too full, or they won’t cook properly. Cook 8-12 at a time, depending on the size of the pan. User Halfway Flip the Gulgule: Halfway flip the gulgules when gulgules are golden bottom side. During frying, the gulgules enlarge, so turn them not quite fast but round and round to complete frying uniformly. Excess Oil Drain: Drain gulgules and put them on paper towels when they become golden brown and crisp, and drain excess oil off them using a slotted spoon. Serve and Enjoy! Gulgule tastes delicious when served hot. Serve them with your favorite Masala Chai or Ginger Chai as the ideal tea-time snack. Alternatively, serve them with Rabri (sweet milk) or Rice Kheer as a treat. Expert Tips for Perfect Gulgule To ensure that your gulgule turns out just right every time, the following is what you should know: Don’t Over-Mix: The batter should not be over-mixed, or it will create gluten, and the gulgule will not be light but heavy. Maintain Water Ratio: In case of using finely ground wheat flour, keep it in proportion to water. Take 8 tablespoons and keep the proportion in mind. Maintain hot oil: Oil should be hot at 350-375°F. Too hot, gulgule burnt on the outside but not cooked within. At extremely low temperatures, the batter will get stuck in the pan. Fry in batches: Do not fill the pan with too much batter. Fry 8-12 gulgule in batches so that they get cooked evenly. Baking Powder for fluff: To give the gulgule a very fluffy texture, use 1 tsp baking powder. Alternate Cooking Method: Cook otherwise by cooking in an appe pan (aebleskiver pan) with little oil or in ghee for intense flavor. Final Thoughts Gulgule is an excellent snack that’s delicious as well as very easy to make. Be it preparing them for a celebration like Diwali or Holi, or just for an afternoon snack, they’ll make everyone smile everywhere. The hard exterior and soft interior ensure every bite is the perfect mix of texture and taste. Then try this recipe, and enjoy your home-made Gulgule and a cup of chai—your taste buds will be forever grateful! Also Read: Easy Dal Baati Churma Recipe: Step-by-Step Guide
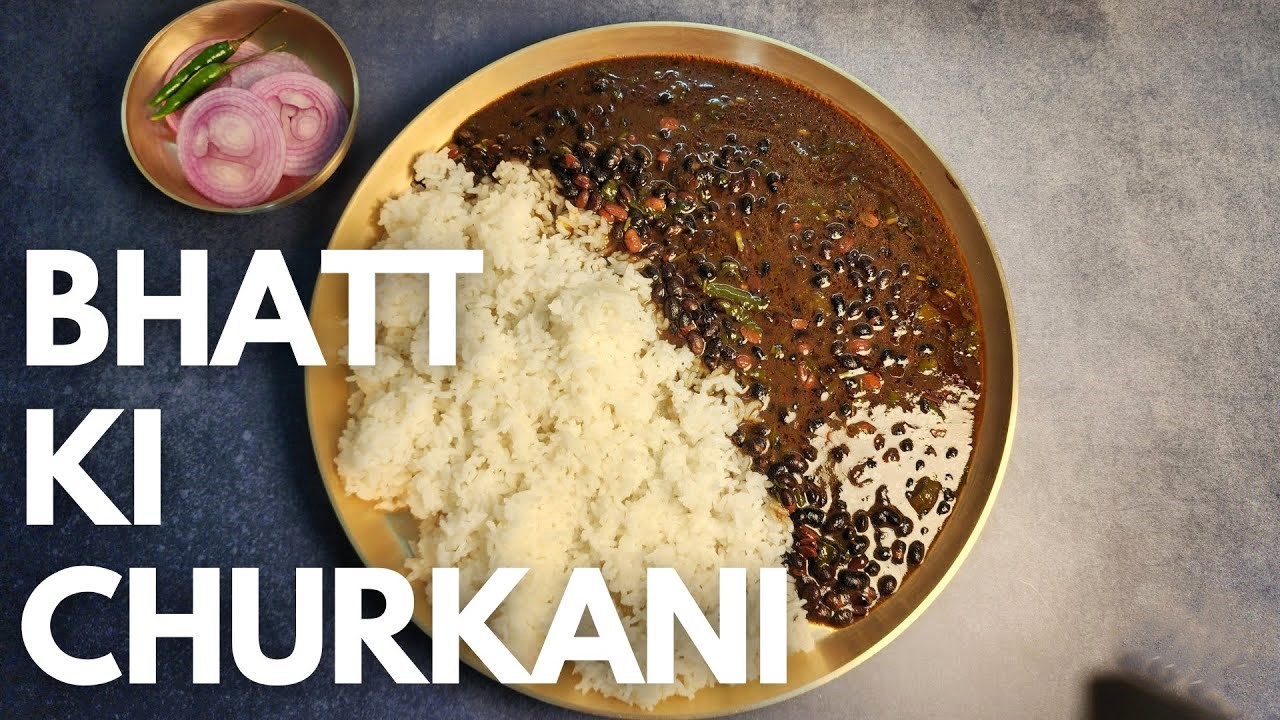
Recipe Of Bhatt Ki Churkani – Step by Step
Nestled in the beautiful hills of Uttarakhand, Kale Bhatt, also known as soybean dal, is a local gem that holds a special place in the hearts of Kumaoni people. It’s not just a dish but a part of the cultural fabric of the region. When it comes to special occasions, no celebration is complete without Bhatt Ki Churkani. This flavorful and nutritious dish is not only easy to prepare, but it also comes packed with numerous health benefits, including high fiber content that helps in reducing cholesterol levels. Let’s take a deep dive into the recipe for this Kumaoni delicacy. Bhatt Ki Chudakani – A Step-by-Step Guide Ingredients: Oil (for frying) Salt (to taste) Turmeric powder (to taste) Red chili powder (to taste) Flour (1 handful) Jakhiya (a type of mustard seed native to Uttarakhand) Onion (finely chopped) Tomatoes (finely chopped) 300 grams of Kale Bhatt (black soybeans) Method: Fry the Kale Bhatt: Start by carefully picking out any stones from the black bhatt. If you prefer, soak the black bhatt in water overnight. However, you can also prepare it by frying it directly. To do this, heat some oil in a pan and fry the black bhatt. You’ll know it’s ready when you start hearing a slight popping sound. At this point, it means the bhatt is properly cooked. You can also taste it to ensure it’s just right. Prepare the Spice Mix: Heat more oil in a separate pan and add jakhiya (a type of mustard seed). Once the jakhiya starts to splutter, add finely chopped onions and sauté them until they turn golden brown. Add chopped tomatoes to the mix and cook until soft. Now, add salt, red chili powder, and turmeric powder according to your taste. Fry this spice mixture for a few more minutes until the flavors meld together. Make the Flour Mixture: Take a small bowl and mix flour with 1-2 cups of water, stirring continuously. The mixture should become thick. Now, pour this mixture into the pan with the spices, stirring to combine. Continue cooking this mixture while stirring until it begins to bubble. Combine Everything: Add the fried black bhatt into the pan with the spice and flour mixture. Cook the dal on low heat for about 15-20 minutes, allowing the flavors to come together and the bhatt to become tender. The final dish should have a deep, dark black color, and the curry will thicken. Serve: Once the bhatt is soft and the curry has thickened, your Bhatt Ki Chudakani is ready to be served! It pairs wonderfully with hot, steamed rice for a wholesome, satisfying meal. Bhatt Ki Chudkani Recipe Card Total Time: 30 minutes Preparation Time: 10 minutes Cooking Time: 20 minutes Servings: 4 Cuisine: Indian (Uttarakhand) Calories: 125 per serving Cooking Level: Medium Final Thoughts: Bhatt Ki Churkani is not just about the ingredients but about the story and tradition behind it. This Kumaoni dish is a perfect example of how simple ingredients, when combined with care and love, can create something so rich in flavor and heritage. Whether you’re cooking it for a special occasion or simply looking for a nourishing, hearty meal, this dish will bring the authentic taste of the hills straight to your kitchen. Have you tried making Bhatt Ki Chudakani before? If not, now’s the time! We’d love to hear about your experiences in the comments below. Stay connected for more delightful recipes from Uttarakhand and beyond! Also Read: Vegetable Masala Maggie Recipe: Step by Step
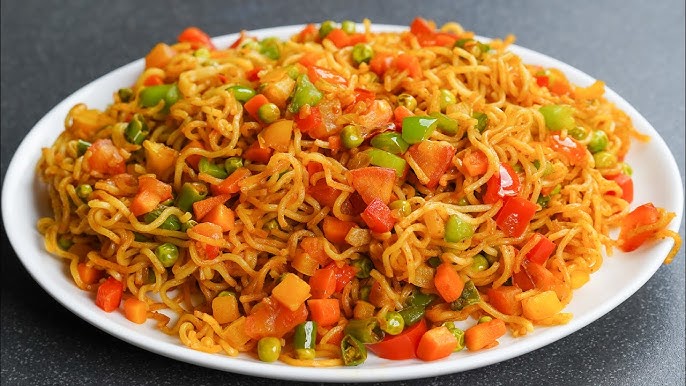
Vegetable Masala Maggie Recipe: Step by Step
Maggi is not just instant noodles, it is an emotion. Many memories are associated with these instant noodles. Although it is not a health food, but it is a savior for singles, hostel people, travelers, working mothers, and many others. Maggi is a simple 15-minute meal that includes lots of veggies like onion, tomatoes, carrot, capsicum, etc. Instead of making plain Maggi, you can easily make this budget-friendly dish at home and avoid ordering food from outside. It is perfect for a quick snack & much popular in hilly areas like Manali, Darjeeling and many more Maggie can be eaten at any time whether its morning breakfast, lunch, or dinner. Maggie also has multiple varieties like plain Maggie, masala Maggie, vegetable Maggie, cheesy Maggie, etc. Vegetable masala Maggi is my favorite, and I add vegetables to it to make it fully loaded and to enhance the taste, add red chili powder, turmeric, and salt and mix the spices. So, if you looking for a Vegetable Masala maggie recipe. Here, I am going to share how to make Maggie step by step. Ingredients for Maggie 1 packet Maggi Noodles 1 small chopped onion 1 small chopped tomato 1 small chopped carrot 1 small chopped capsicum 1-2 tbsp oil 1/2 tsp turmeric powder 1/2 tsp red chilli powder Salt (to taste) How to make vegetable masala Maggie step by step Heat the oil in a pan and stir in the chopped onion until they are transparent. After that, add the chopped carrot and capsicum and fry them. Pour turmeric powder, chili powder, and salt (to taste) and stir the vegetables. Then add your chopped tomatoes and cook till the raw smell goes away. Add 1-2 cups of water to the vegetables. Bring the water to a boil before adding the noodles and Tastemaker masala. Cook the Maggie and allow the water to absorb completely, stirring occasionally. Turn off the flame and serve the vegetable masala Maggie immediately. Also read: Chicken Momos Recipe: Step by Step Guide
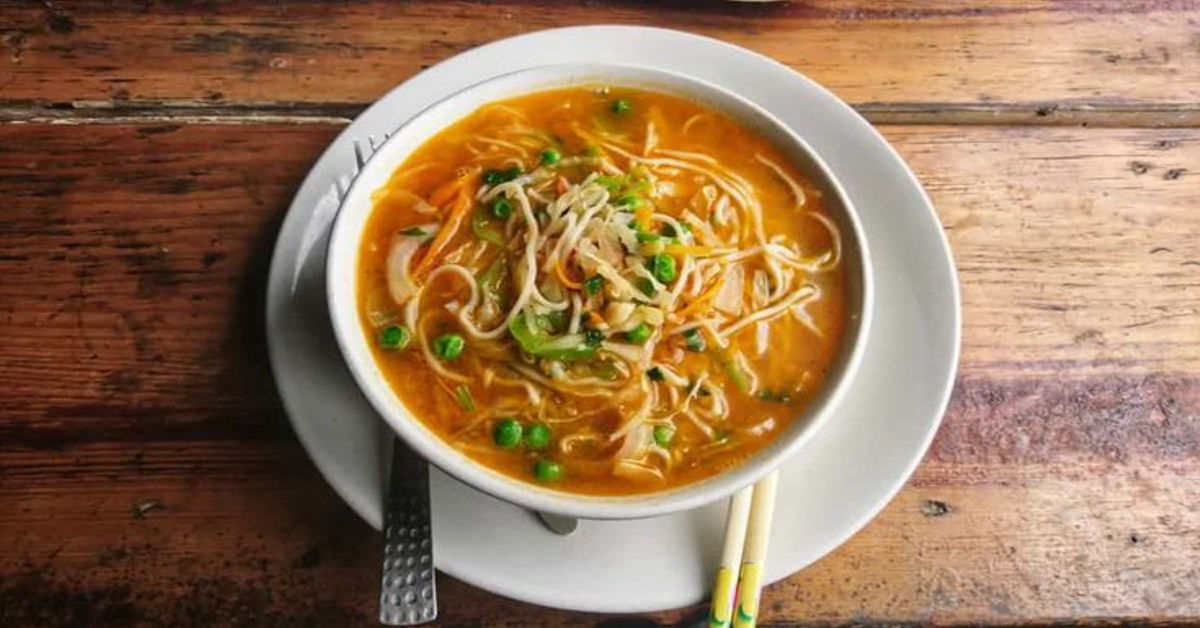
Recipe of Thukpa : Vegetable Thukpa (Tibetan Soup)
Vegetable Thukpa is a popular soup from Tibet and Nepal. It is inspired by Chinese cuisine and uses vegetables. It is spicy, nutritious, and comforting. I make this vegetable noodle soup in the Instant Pot. Tibetan thupka is very easy and convenient to make for dinner. Some basic vegetables added to thukpa are radish, tomatoes, spring onions, and spinach, and you can also add any vegetable of your choice. Adding garlic enhances the taste of the Tibetan thukpa soup. This is a great recipe to have when you are feeling sick or need something warm on a cold day. So here I’m sharing the recipe of thukpa, which is easy to make at home. Ingredients for the thukpa recipe 250 g of noodles 2 tbsp oil 1-2 tsp salt 1 Litre of water 1 Chopped carrot 1 chopped Onion 1 cup chopped cabbage 1 cup chopped mushrooms 1 chopped capsicum 1 tbsp finely chopped ginger 1 tbsp finely chopped garlic 2-3 green chilli 1 tsp turmeric powder 1-2 tsp chili powder 1/4 cup chopped spring onion 1 tbsp mustard oil 2 tomatoes (roasted) 10-12 soaked dried red chilies 2 tbsp soya sauce 1/4 cup chopped coriander leaves 3-4 green chilli Extract 1 lemon juice Instructions for the Recipe of Thukpa Step 1: Boil the noodles Boil 1 liter of water. Add a 1tsp of salt and a 1tbsp of oil. Then add 250 g of noodles and cook for 5-10 minutes or until they are almost soft but still slightly chewy. Strain the noodles and keep them aside. Step 2: Prepare the Vegetable Stock Put all the Sliced vegetables (onion, carrot, cabbage, and mushroom) in a cooker and add water so the vegetables are completely covered. Cook for 4-5 whistles till the vegetables release their juices, making a rich stock. Step 3: Roast the Aromatics Heat oil along with some mustard oil in a pan. Add finely chopped ginger and garlic. Fry till golden brown. Step 4: Add Spices and Vegetables Add 2-3 green chilies, 2 tbsp soya sauce, 1 cup cabbage, 1 cup mushroom, 1 bell pepper, and 1/4 cup spring onion to the pan. Add 1 tsp turmeric powder and 1 tsp chili powder and mix. Saute the mixture until the vegetables become soft. Step 5: Combine Noodles and Stock Strain the prepared vegetable stock into a pan with the fried vegetables. Add the reserved noodle cooking water to enhance the taste. Boil the mixture and cook over low heat for 2-3 minutes. Add boiled noodles and mix properly. Step 6: Prepare the Spicy Tomato Sauce/ Chutney Roast 2 tomatoes and mix them with 10-12 soaked dried red chilies, 3-4 green chilies, 1/4 cup chopped coriander leaves, and juice of 1 lemon. Mix till it becomes a coarse paste. Step 7: Serve the Thukpa Pour the thukpa into a bowl and top with spicy tomato sauce or chutney. Garnish with coriander leaves. Serve it hot and enjoy. Also read: How to Make Best Tea (Chai): Recipe

How to Make Best Tea (Chai): Recipe
For Indians, tea is an emotion and is one of the most popular drinks in India. If you are an Indian, then you might already know this, and if you don’t then let me tell you that we Indians love tea. So, every Indian knows how to make best Tea (Chai). Whether it’s 6:00 am or 6:00 pm, in India every time is tea time and we can drink tea with almost anything. Tea is the only thing that we can drink all the time, like when we are stressed, when we are sad, when we are happy, etc. Or when it rains, then tea is necessary no matter how hot it is. We may disagree on many issues, but when it comes to tea, the whole country becomes united. So, the first thing my mother taught me was how to make different types of chai, like chai(milk tea), masala chai, etc. Now I also know how to make Darjeeling tea. So here I am sharing my recipe for making this type of chai/ tea step by step. Ingredients for Chai (Milk tea) Milk 1-2 cup Sugar 2tbsp Tea leaves 1tbsp Water 1/2-1 cup Ingredients for Masala Chai Milk 1cup Water 1cup Sugar 2tbsp Tea leaves 1tbsp Ginger 1/2 inch Cardamon 2-3 Black pepper 5-6 Cloves 4-6 Chai masala 1/2 tsp Ingredients for Darjeeling tea Water Milk Sugar Darjeeling tea leaves How to Make Tea (Chai): Milk Tea Take water and milk in a pan and bring it a boil. Add 1tbsp tea leaves and 2 tbsp sugar and boil the tea for about 5 minutes. Turn off the heat, strain the tea in a cup. How to Make Masala Chai Take water in a pan and bring it a boil. Then add ginger, cardamom, black pepper, Clovis dal and boil it. Now add sugar and tea leaves in it along with milk and let it boil for 5 minutes. At last, add chai masala and boil for about 1-2 minutes. Turn off the heat, strain the tea in a cup. How to Make Darjeeling Tea Take water in a pan and bring it to a boil. Add Darjeeling tea leaves to the water and boil for 2 minutes. Then add sugar and milk and boil it for 5-7 minutes. Turn off the heat, strain the tea in a cup. Your Darjeeling tea is ready.
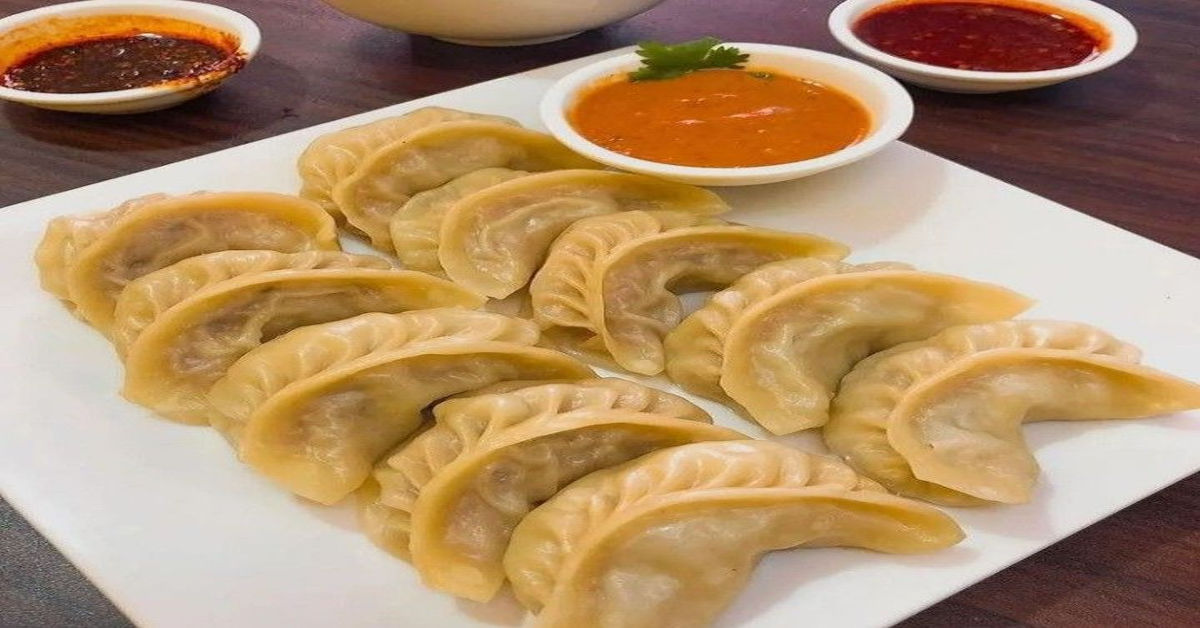
Chicken Momos Recipe: Step by Step Guide
Chicken momos are tasty Savory dumplings, that originally a traditional dish from Tibet. It is also known as chicken dumplings and dim sum, which are mostly popular in Asian countries. In India, there are many street food stalls selling a variety of momos with veg, paneer, chicken or meat filling. There are different types of Momos, but steamed and fried are much popular, and they are served with different types of momos chutney like red spicy tomato chutney, chilli garlic chutney, coriander chutney and mayonnaise. So, here I’m sharing my chicken momos recipe, along with a spicy red tomato chutney recipe. I really love to eat chicken momos, and so I make homemade chicken momos and literally momos are so tasty, so I thought that I’ll share with you how to make juicy chicken momos at home. The stuffing was always easy to make, but the covering and pleating were a bit tricky, but if you try for few times, you will get to know the trick and after that you can make the momos shape easily. Chicken momos ingredients Flour: 1 cup Salt: ½ tsp Oil: ½ tsp Water: ½ Cup Ingredients for chicken momos filling Boneless chicken Breast: 250 grams Onion: 1 big size Green chilli: 2-3 Ginger: ½ inch Garlic: 4-5 cloves Coriander leaves Salt: as required Black pepper: ½ tsp Oil/ ghee/butter: 1-2 tbsp Momos chutney ingredients Tomatoes: 2-3 big size Kashmiri red chilli: 12-15 Garlic:10-12 cloves Ginger: ½ inch Soya sauce: 1 tsp Vinegar: 1 tsp Salt: as per required Sugar: a pinch Steps for chicken momos recipe Take 1 Cup Flour, salt (as per your taste), oil and add water slowly for a smooth dough which is not too hard and not too soft. Keep it aside for at least 30 minutes. Cut the chicken chest pieces into small pieces and chop finely in a mincer or grinder. Finely cut the onion, green Chilli, garlic, ginger, and coriander. Add all the chopped veggies and herbs, salt, black pepper and oil (ghee or butter) to the chicken. Oil keeps the chicken damp and juicy. Make small balls of the dough, then apply tempering on them and make thin puris (circles) of 3-inch diameter. Put 2 tbsp of chicken momos stuffing in the centre. Now you can uplift and take puris (circles) on one side and press the edges to seal them. Start pleating and join the same pleat. Once you are done with the pleating, fold it a little and press together to seal, and your chicken momos shapes are ready. You can shape momos in many ways. Start sealing the edges as before and fold a little differently, joining the other side of the circle and keep folding until you finish. Once you get used to it, you’ll be able to do it faster. Pour water in the steamer and let it boil. Apply some oil, ghee or butter to the steamer plate and arrange your momos apart so that they don’t stick to each other. Steam your momos on medium flame for 10-15 minutes or until they become transparent. Preparation of red spicy tomato chutney Boil tomatoes and Kashmiri red chilli in water for 5 minutes and keep them aside for at least 10 minutes. After 10 minutes, remove the excess water and peel the tomato skin. Now grind the tomatoes, chillies, along with ginger and garlic in a grinder till you get a proper chutney texture. Add salt, sugar, vinegar and soya sauce and mix them properly. Your red spicy tomato chutney is ready. Here ends the Chicken Momos Recipe. If you have any questions or feedback, please write in on Comment box. Thank you Also Read: Easy Dal Baati Churma Recipe: Step by Step Guide

Easy Dal Baati Churma Recipe: Step-by-Step Guide
Dal Baati Churma is a traditional, delicious meal made with a combination of savory dal, wheat flour (baati) and crumbled, sweet and savory baati (churma). Dal Baati Churma is a Rajasthani dish that must be tried at home to savour its flavours and make the day special. The spicy dal, sweet churma and crispy fried batis, this is a very tasty dish. A few weeks ago when I was looking at the picture of Daal Baati Churma on Google, I was so tempted that I decided to make it the very next day and thought that i’ll share Dal baati churma recipe with peoples. I went to a nearby shop and got the required ingredients and started making it immediately. I thoroughly enjoyed the whole process. And how can I forget to mention about the food, I love North Indian cuisine so much that I had Dal Baati Churma for breakfast. Here I am sharing my own Rajasthani dal bati churma recipe. Ingredients for Dal bati churma recipe For dal 1/2 cup arhar dal 1/2 cup chana dal 1/2 cup moong dal 1 tbsp urad dal 1 tsp finely chopped garlic 1 medium size finely chopped onion 1 medium size roughly chopped tomato 2 tsp chilli powder 1 tsp turmeric powder 1 tsp coriander powder 1/2 tsp garam masala 2 tsp finely chopped coriander leaves For tempering: 2 tbsp ghee 1 bay leaf 2 tsp cumin seeds 2 cloves 2 chopped green chilli pinch of hing FOR BATI: 1/4 cup wheat flour 1/2 cup fine rava 2 tbsp gram flour 1/3 cup milk 4 tbsp melted ghee 1/2 tsp ajwain salt to taste FOR CHURMA: 1/2 cup wheat flour 1/2 cup fine rava 5 tsp melted ghee 1/2 tsp cardamom powder 4 tbsp powdered sugar melted ghee FOR SERVING: raw chopped onion lemon juice ghee Instructions: How to make dal baati churma DAL: Wash the dal thoroughly and cook them with salt, pinch of turmeric powder and 2 cups of water till 3-4 whistles. when the pressure is released, you can mash it well with a ladle and keep it aside. Heat ghee in a pan and put all the ingredients mentioned for tempering and let it explode. Add chopped garlic, onions and Saute till onions become translucent. Then add tomato, turmeric, coriander, red chilli and garam masala powder and salt. Saute for minute till the raw smell of tomato goes. Now add mashed dal and mix it well. Let the dal boil for 5 minutes, if the dal are too thick then add some water. Finally garnish the dal with coriander leaves and turn off the flame. BATI: Take all the ingredients mentioned for Baati in a bowl and knead a stiff dough. Now take a small lemon sized dough and roll. Make marks using your hand. Roll forward without applying too much pressure. Again, make an X mark. This helps the baati to cook evenly on the appe pan. Now heat the pan on low flame adding 1 tbsp ghee. place the rolled bati in each mould. Now cover and cook for 15 minutes on low flame Flip and cook on the other side. Cover and cook for 15 minutes. now your battis are cooked from all the side. You should dip your bhattis in ghee for softer bati from inside which tastes delicious. Finally, the Baati is ready. CHURMA: firstly, take 3 prepared bati and break it in mixer. Make coarse powder of bati. Heat the pan adding 2-3 tbsp ghee in it and roast powdered Baati Roast over low heat for 7 minutes or until golden and aromatic. Let the mixture cool done completely. After that add 2-3 tbsp powdered sugar and 1/2 tsp cardamom powder and mix it well. Finally, Churma is ready. Serving Suggestion: How to eat Dal Bati Churma Heat the dal again till piping hot. Break the Bati and place it in a plate, add dal on top, pour some ghee, sprinkle chopped onions, add lemon juice and eat with Churma. Also Read :- How to make Veg Momos: Complete recipe of Momos Expert Tips: You can make the churma a day before and keep it in the fridge. Traditionally Baatis are fried in ghee but you can use oil. You can flip the bati to the other side after 10 minutes to cook it well. The baatis are meant to have cracks because our dough is hard. The specialty of this dish is that plenty of ghee is used in it. Here ends the Dal Baati churma Recipe, if you have any questions or feedback please write in on Comment box. Thank you
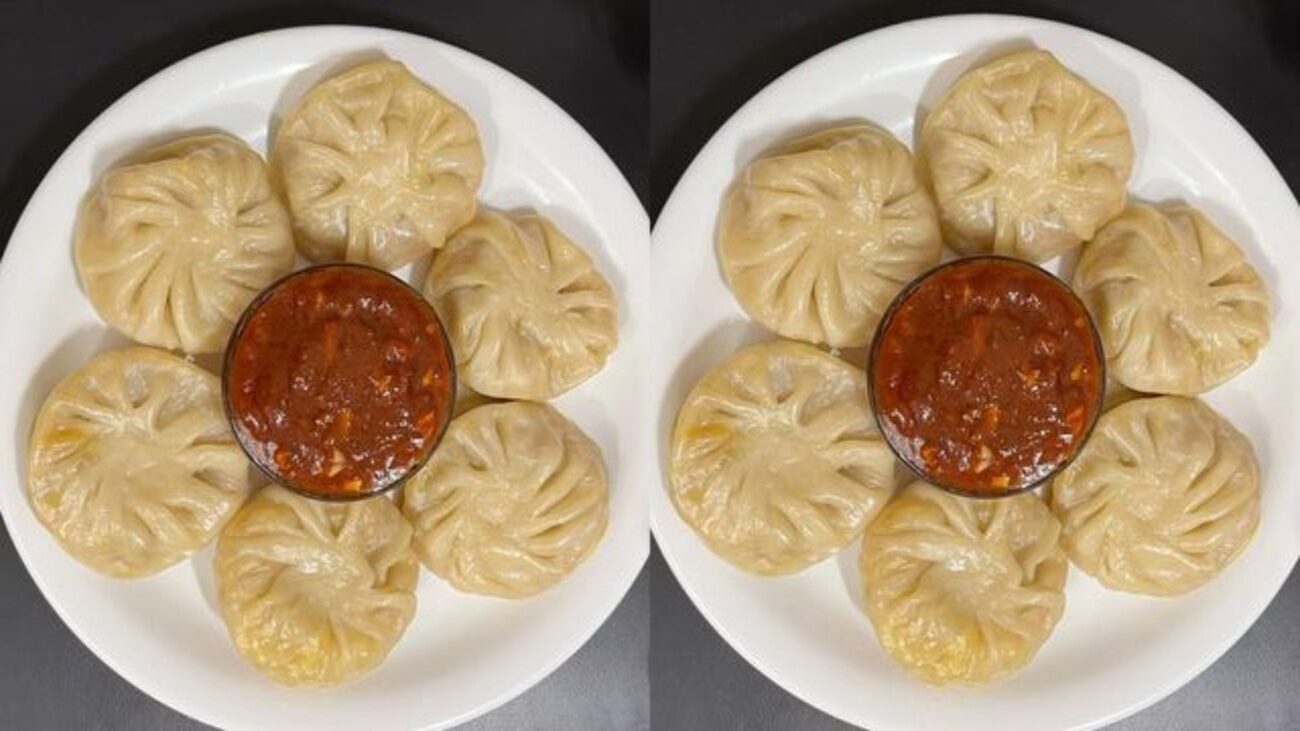
How to make Veg Momos: Complete Momos Recipe
Momos are a type of dumpling that is originated from Nepal and Tibet and are very popular in India. You can buy them from restaurants and street as well. Veg momos have a delicious filling of (cabbage, onion, carrot, ginger and garlic), and paneer momos have a filling of paneer, onion and ginger garlic. And there are different types of momos like steamed, fried, Afghani, tandoori, KFC momo, malai momo, and Afghani tandoori momos etc. I have tried all these types of momos but I love eating Afghani Momo. These momos are served with red chutney, extra hot red chili chutney, white mayonnaise and tandoori mayonnaise. If you are looking for how to make veg momos. So you can make veg momos recipe step by step home too, here is the complete recipe of momos. Can momos be made without Flour (maida) Yes, momos can be made without flour (maida). You can use the alternatives like rice flour or wheat flour to make the dough for momos. Both the options are great substitutes for flour (maida), rice flour gives a slightly different texture and wheat flour gives a more traditional feel and they are a healthy version of eating momos. What are the Ingredients in Momos For dough 1 Cup Flour 1 tsp Oil Half Cup Water or as much required Salt as per your taste Veg Momos Filling 1-2 minced garlic cloves 1/2inch grated Ginger 1 tbsp coriander leaves 1/2 cup finely chopped cabbage 1/2 cup finely chopped carrot 1/2 cup finely chopped bell peppers 1/2 cup finely chopped Onion 1/2 tbsp Salt 1/2 tsp black pepper For Paneer Momos filling 1 cup crumbled Paneer 1 cup finely chopped onion 1-2 minced garlic cloves 1/2inch grated Ginger Recipe of momos dough Take 1 Cup Flour, 1tsp salt, 1 tsp Oil and mix them well with the spoon or hand. Add water and knead a stiff dough. Make sure the dough is not soft as it will make it difficult to make momos. You can adjust water requirements if necessary. And then cover the dough with a wet towel and let the dough rest for about 30-45 minutes. How to make the vegetable stuffing Take 2 cups of finely chopped vegetables like cabbage, carrot, bell pepper and onion along with some ginger and garlic. After that heat oil in a pan and add 1/2 tsp of finely chopped garlic and stir on medium flame for 2-3 seconds. Then add all the finely chopped vegetable. Saute the vegetables on medium or high flame for about 2-3 minutes and then add 1/2 teaspoon black pepper and salt as per taste. Switch off the flame. Check the taste and add pepper, salt if needed. The vegetable filling is ready. Now let the filling cool completely. Portion and Roll Dough Divide the dough into 2 parts. Make 8-10inch ball from each portion. Make small balls of each dough piece and keep them covered with a moist napkin. Take each small ball and place it on a lightly dusted board and roll the ball in a thin circle and make sure the edges of the circle should be thin and the center part of the circle should be thick. Apply water to the perimeter of the circle with the tip of your finger. Shaping Technique – 1 Place 1-2 spoons of vegetable mixture in the Centre. Lift up one side of the edge and start pleating. Join all the folds in the middle. A pleated and shaped momos are ready. Shaping Technique – 2 This is an easy method. You can shape the momos like gujiya. You can stop here or move on to the next step. Bring two ends together and join them. Make all the momos this way and keep them covered under a wet towel until you are ready to steam them. How to Steam the Momos Apply some oil to the steamer pan. Place them in the pan and keep space between them. You can use a steamer pan, but if you don’t have a steamer then you can also use an idli pan to steam the momos. And add 2-3 cups of water to the pan for steaming. Steam for about 10-15 minutes till the outer layer become transparent & make sure you don’t overcook as it make the outer layer chewy. Steaming may time more time according to thickness of your momos outer layer. When you touch the momos, you will not feel the dough sticky. This means that the momos are cooked and the momos look transparent. Serve your veg momos hot with mohttps://tripntaste.com/wp-content/uploads/2025/03/Spicy-Momos-Chutney-Recipe-Easy-to-Make-Khaddoroshik.jpegmos chutney or extra spicy red chili chutney, white mayonnaise or tomato sauce. They also taste best with spicy sauces and should be eaten hot. Recipe of momos chutney Place a pan over medium heat, add 1/2 tablespoon oil, 3-4 garlic cloves, 1/2 inch finely chopped ginger, 4-5 dried red chilies, 5-6 green chilies and 2/3 cup chopped red onion and cook for about 8 to 10 minutes or until it gets brown. Add salt as your taste, a pinch of sugar, 1/4 tsp Kashmiri chili and cook for 2 minutes. Then add 3 chopped tomatoes and cook for 3-5 minutes until it becomes soft. Add 2 tbsp coriander leaves to it, mix well and keep aside to cool completely. When everything cools down, transfer the cooled mixture into a grinder and grind it until it gets smooth. Then serve the chutney with your favorite momos. This momos chutney tastes even better after days. So, you can store it in a airtight container in the fridge for 2-3 weeks. Also Read :- Chicken Momos Recipe: Step by step Guide

Best Ghewar Recipe : How to Make Rajasthani Ghewar
Ghewar is a traditional Indian sweet, Ghewar is mostly famous in state of Rajasthan, Udaipur and especially Delhi and surrounding regions that holds a special place in the hearts of many, especially during festivals like Raksha Bandhan, Teej and many more. It is a deep fried dish. And ghewar made from a mixture of flour and water & then we dip it in sugar syrup and garnish it with silver leaves, dry fruits and sometimes saffron. Making Ghewar can be very difficult but if we use a little patience and adopt the right method, we can easily make this famous ghewar sweet at home whether you want to prepare desi ghee Ghewar or dry fruit Ghewar. Here you can find Best Ghewar recipe. Can Ghewar Be Kept in the Fridge? Yes, we can store Ghewar in fridge to keep it fresh for a longer period of time. However, it is best to consume it within a few days as it may lose its crispness if stored for a longer period of time. To store, place Ghewar in an airtight container and refrigerate it. Before eating, you can bring it to room temperature for the best taste and texture. Can Ghewar be Eaten in Fast like Sawan or Shivratri? Traditionally it is made with flour and sugar, So Ghewar is not suitable for fasting during Sawan or Shivratri or any other kind of fasting, as all the fasts require special ingredients. To make it fast-friendly, you can use buckwheat flour or water chestnut flour instead of regular flour, also use rock salt instead of regular salt, and opt for sugar alternatives like rock sugar. This modified Ghewar Recipe allows you to enjoy Ghewar while respecting the fasting norms. GHEWAR INGREDIENTS Requirements for Batter For Sugar Syrup For Rabdi Instruction: How is Ghewar Prepared Tips and tricks for making perfect Ghewar at home Read more: How To Make Himachali Siddu At Home: Recipe
How To Make Himachali Siddu At Home: Recipe
Have you ever traveled to Kullu, Manali and Shimla regions, you must have never missed this dish. Himachali Siddu is healthy depending which ingredients you use, as the name suggests, is a favorite and famous breakfast of the local people of the hilly region of Himachal Pradesh. Do you know how to make Siddu at home?? They generally prepare it in winters when there is snowfall and the weather is very cold. Sidhu flour is a yeast based flour prepared exclusively from wheat flour. And this boiled bread has stuffing. The stuffing can be anything, the most famous stuffing is majorly prepared by combining vegetables with walnuts, poppy seeds or urad dal. This steamed yeast bread is definitely a must try. Lets see the recipe of siddu. How to make siddu and what are the siddu dish Ingredients For the dough: Urad filling: Nut filling: Instructions: To make the dough: For Urad dal filling: For Nut filling: To Make the Siddu Recipe at Home: